

< Previous | Contents | Next >
Section 5 Welders and Welder Performance Qualification Tests
501. General
1. Each welder intended to engage in the manual and semi-automatic welding work specified in this Section is to pass the performance qualification tests required according to the applicable welding process, welding position and kinds of materials to be welded and to have the performance qual- ification by the Society.
![]()
![]()
2. Welders engaged in tack welding should be qualified for either butt welds or fillet welds, for the welding process and the position corresponding to the joint to be welded. If requested, the Society may qualify those welders engaged in tack welding works only in accordance with the Guidance in relating to Rules. See Guidance
![]()
![]()
3. Welding operators intended to engage in automatic welding work are to be those skillful for the actual welding work in which they will engage. If requested, the Society may qualify those welding operators engaged in automatic welding works only in accordance with the Guidance in relating to Rules. See Guidance
![]()
4. The performance qualification test of welder intended to engage in the special material and welding work not prescribed in this Section are to be at the discretion of the Society. See Guidance![]()
![]()
5. The application of more suitable requirements instead of the requirements of this Section is left to the discretion of the Society. See Guidance![]()
502. Grades, and range of qualification
1. A welder should be qualified in relation to the variables such as base material, welding process, type of welded joint, plate thickness and welding position.
2. Welding processes
(1) The welding processes for welder’'s qualification are to be classified in Table 2.2.12-1.
Table 2.2.12-1 Welding processes for welder’'s qualification
Symbol | Welding process in actual welding works | |
M | Manual welding | Shield Metal Arc Welding(SMAW) |
S | Semi-automatic welding | (1) Flux Cored Arc Welding(FCAW) (2) Gas Metal Arc Welding(GMAW) |
T | TIG welding | Gas Tungsten Arc Welding(GTAW) |
(2) A welder intended to engage in the multi-process welding work is to pass the separate perform- ance qualification tests for each welding process.
3. Types of welded joint
(1) The types of welded joint for welder's qualification are to be classified as shown in Table 2.2.12-2 in accordance with the qualification test.
(2) A qualification test performed using butt welds automatically qualifies fillet welding.
(3) The Society may qualify the welders who However, where such welders are engaged to
for butt welds.
are employed to perform fillet welding only. weld fillet with groove they are to be qualified
![]()
Rules for the Classification of Steel Ships 2015 135
![]()
Table 2.2.12-2. Types of welded joint for welder's qualification
Type of welded joint used in the test assembly for the qualification test(1) | Type of welded joint qualified | |||
Butt weld | Single sided weld(2) | With backing | WB | WB, FW |
Without backing | NB | WB, NB, FW | ||
Fillet weld | - | FW | FW | |
NOTES: (1) A qualification test performed using butt weld test assembly for pipes automatically qualifies butt weld test for plates. (2) A qualification test performed using single sided weld automatically qualifies double sided weld. | ||||
4. Base materials
(1) Base materials for qualification tests are grouped as follows;
(a) Carbon and low alloy rolled steels, tubes and pipes, castings and forgings
(b) Stainless rolled steels, tubes and pipes, castings and forgings
(c) Aluminium alloy
(d) Copper alloy castings
(2) A welder passed the qualification test with certain material in specific material group may be
accepted to weld other materials in same material group.
(3) For welding with materials in different material groups, qualification approval may be carried out with separate qualification test for each material.
5. Thickness and outer diameter of base metal
(1) The welder qualification carried out on a plate or pipe test assembly of thickness T is valid for the thickness range given in Table 2.2.13-1
![]()
![]()
Table 2.2.13-1 Qualified thickness range for welder qualification
Grade | Thickness of test assembly, T(mm) | Qualified thickness range t(mm) |
1 | T 3 | T t<2T |
2 | 3<T 20 | 3<t 2T |
3(1) | 20<T | 5<t |
3R | 12.5<T | 5<t |
Note (1) For aluminium alloy, the upper limit of qualified thickness range is to be 40mm. For aluminium alloy with thickness over 40mm, additional tests may be carried out as deemed necessary by the Society. | ||
(2) The welder qualification carried out on a pipe test assembly range given in Table 2.2.13-2.
is valid for the outer diameter
![]()
![]()
Table 2.2.13-2 Qualified outer diameter range for pipe welds
Grade | Outer diameter D (mm) | Qualified range |
1 | D 25 | D 2D |
2 | 25<D 150 | 0.5D 2D(Min. 25mm) |
3 | 150<D | 0.5D |
3R(T, K and Y Joint) | 150<D | 100mm |
Note; (1) Test assemblies for the pipes over 500 mm in diameter may be those for the plates. | ||
![]()
136 Rules for the Classification of Steel Ships 2015
![]()
6 Positions
The positions for qualification test and positions qualified with the Table 2.2.14.
for actual welding work are to comply
Table 2.2.14 Welding Positions for Welder Qualification
Grade | Test Positions(1) | Welding positions in actual welding work(2) | |||||
Plates | Pipes | ||||||
Butt joint | Fillet joint | Butt joint | Fillet joint | ||||
For each grade of plates | Flat | 1G | F | F, H | F(3) | F, H | |
1F | - | F | - | F | |||
Horizontal | 2G | F, H | F, H | F, H(3) | F, H | ||
2F | - | F, H | - | F, H | |||
Vertical-upward | 3G-up | F, H, VU | F, H, VU | F, H, VU(3) | F, H, VU | ||
3F-up | - | F, H, VU | - | F, H, VU | |||
Vertical-downward | 3G-down | F, VD | F, VD | - | - | ||
3F-down | - | F, VD | - | - | |||
Overhead | 4G | F, H, OH | F, H, OH | F, OH(3) | F, H, OH | ||
4F | - | F, H, OH | - | F, H, OH | |||
3G-up+4G | All(5) | All(5) | All(3) | All | |||
For each grade of pipes | Horizontal-rolled | 1G-P | F | F | F | F, H | |
1F-P | - | F | - | F | |||
Vertical-fixed | 2G-P | F, H | F, H | F, H | F, H | ||
2F-P | - | F, H | - | F, H | |||
Horizontal-fixed | 5G-P | F, V, OH | F, V, OH | F, V, OH | F, V, OH | ||
5F-P | - | F, V, OH | - | F, V, OH | |||
Vertical-fixed+Horizontal-fixed (2G-P)+(5G-P) | All | All | All | All | |||
Inclined-fixed | 6G-P | All | All | All | All | ||
6F-P | - | All | - | All | |||
Inclined-fixed with restriction ring (6GR-P)(4) | All | All | All | All | |||
NOTES: (1) Test positions are to comply with Fig 2.2.9 and Fig 2.2.10. (2) F=Flat, VU=Vertical-Up, VD=Vertical-Down, H=Horizontal, OH=Overhead (3) Only qualified for pipe over 500 mm in outer diameter. (4) Test in the 6GR-P position qualify welding in T, K & Y connection(Grade 3R) and welds with re- stricted access. (5) Vertical-downward position is not included. | |||||||
![]()
Rules for the Classification of Steel Ships 2015 137
![]()

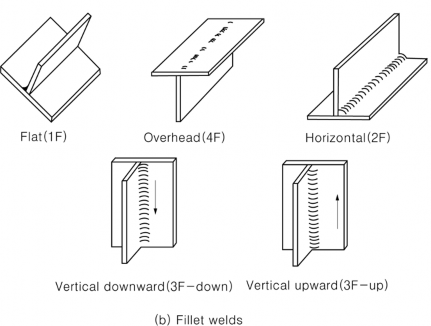
Fig 2.2.9 Welding position of plates
![]()
138 Rules for the Classification of Steel Ships 2015
![]()

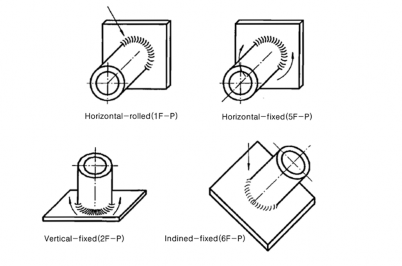
Fig 2.2.10 Welding position of pipes
503.
1.
2.
Testing procedure
General
(1) Test assemblies may be welded with either alternating current or direct current.
(2) The test assemblies are not to be changed their up-and-down or right-and-left position through- out the welding operation.
(3) The welding is to be carried out only on one side and the back welding is not to be carried out unless specified otherwise.
(4) In general, the test assemblies for plates are to be so restrained or prestrained that the warping
due to the welding does not exceed an angular distortion of 5 degrees.
(5) The test assemblies are not to be subjected to peening or heat treatment throughout the period before, during and after the welding.
(6) The backing strips of the test assemblies may be used steel plates, copper plate, ceramic or similar materials to obtain the enough penetration.
(7) Welding of the test assemblies and testing of test specimens should be witnessed by the
Surveyor.
Test assemblies
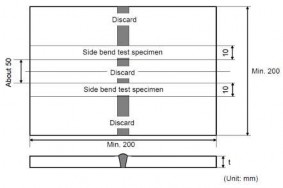
(1) Test assemblies for butt welds and for fillet welds are to Fig 2.2.15 in each qualification test.
(2) Materials used for tests are to be those specified in
to be prepared as shown in Fig 2.2.11
502. 4 or those which are considered
![]()
Rules for the Classification of Steel Ships 2015 139
![]()
equivalent by the Society.
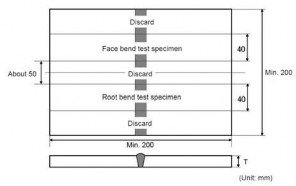
Fig 2.2.11 Dimensions and types of test assembly for butt welds
![]()
Fig 2.2.12 Dimensions and types of test assembly for butt welds(T 12mm)
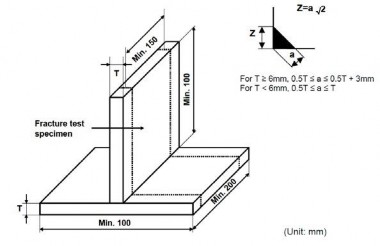
Fig 2.2.13 Dimensions and types of test assembly for fillet welds
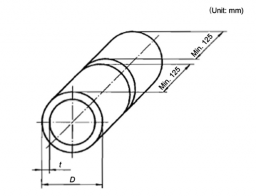
Fig 2.2.14 Dimensions and types of test assembly for pipe butt welds
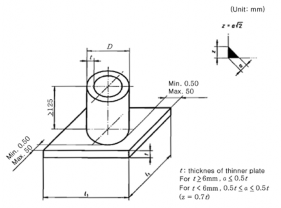
Fig 2.2.15 Dimensions and types of test assembly for pipe fillet welds
(3) The dimensions and types of welded joint are to be as indicated in Fig 2.2.16 and Fig 2.2.17
![]()
![]()
or those which are considered equivalent by the Society. See Guidance
![]()
140 Rules for the Classification of Steel Ships 2015
![]()
Materials | Mild steel and stainless steel | Aluminium alloy |
Grade 1 |
|
|
Grade 2 |
|
|
Grade 3 |
|
|
Fig 2.2.16 Dimensions and types of welded joint-plates
![]()
Rules for the Classification of Steel Ships 2015 141
![]()
Materials | Mild steel and stainless steel | Aluminium alloy |
Grade 1 |
|
|
Grade 2 |
|
|
Grade 3 |
|
|
Grade 3R |
| |
Fig 2.2.17 Dimensions and types of welded joint-pipes
![]()
142 Rules for the Classification of Steel Ships 2015
![]()
(4) Welding consumables used in qualification tests should be type approved one or those which are considered equivalent by the Society.
3. Examination and test
(1) Examination and test are as specified in Table 2.2.15.
Table 2.2.15. Examination and test for Welder Qualification
Kinds | Examination and test(3) |
Butt welds | Visual inspection, Bend test(1) |
Fillet welds | Visual inspection, Fracture test(2) |
NOTES (1) Radiographic test may be carried out in lieu of bend test. (2) Two macro sections may be taken in lieu of the fracture test. (3) Additional tests may be required, at the discretion of the Society. See Guidance | |
![]()
![]()
(2) Visual examination
(a) The welds should be visually examined prior to the cutting of the test specimen for the bend test.
(b)
The result of the examination is to show the absence of cracks or other serious imperfections. Imperfections detected are to be assessed in accordance with quality level B in KS B ISO 5817, except for imperfection type such as excess weld metal, excess pene- tration, excessive convexity and excessive throat thickness for which level C applies
(3) Bend test
(a) One face bend test and root bend test specimen are to be tested. For thickness 12 mm and over, two side specimens may be tested as an alternative.
(b)
(c)
(d)
Bend test specimens are to be of size and dimensions given in Table 2.2.2 according to
the kind of test assemblies.
The mandrel diameter to thickness ratio (i.e. D/t) is to be that specified in each article of
Pt 2, Ch 2, Sec 6 of the Rules +1 except for aluminium alloy for which requirements in
Table 2.2.64 of Pt 2, Ch 2, 608 of the Rules applies
The test specimens are to be bent through 180 degrees. After the test, the test specimens
should not reveal any open defects in any direction greater than 3mm. Defects appearing at
(4)
(5)
![]()
the corners of a test specimen during
Guidance
Radiographic test
When radiographic testing is used in lieu are to be in accordance with the Guidance Fracture test (Fillet welds)
(a) The fracture test of fillet welds is to
![]()
testing should be investigated case by case. See
![]()
![]()
of bend test, test procedures and acceptance criteria in relating to Rules. See Guidance
be carried out in accordance with the requirements
(6)
specified in Pt 2, Ch 2, 405. 8 of the Rules
(b) Evaluation should concentrate on cracks, porosity and pores, inclusions, lack of fusion and incomplete penetration. Imperfections that are detected should be assessed in accordance with
KS B ISO5817, class B.
Macro examination
When macro examination is used for fillet welds, examination procedures and acceptance criteria are to be as follows;
(a) The macro examination of fillet welds is to be carried out in accordance with the require-
ments specified in Pt 2, Ch 2, 405. 6 of the Rules
(b)
(c)
(d)
4. Retest
The test specimens are to be prepared and etched on one side to clearly reveal the weld
metal, fusion line, root penetration and the heat affected zone.
Macro sections should include about 10mm of unaffected base metal.
The examination is to reveal a regular weld profile, through fusion between adjacent layers of weld and base metal, sufficient root penetration and the absence of defects such as
cracks, lack of fusion etc.
![]()
Rules for the Classification of Steel Ships 2015 143
![]()
(1) When a welder fails a qualification test, the following should apply.
(a) For the welder who fails to meet the requirements in a part of the tests, the retests as to the failed tests may be made on duplicate test specimens from the test assemblies welded within 1 month from the date of the failure and the welder may be treated to have passed
the requirements where all test specimens fully comply with the test requirements.
(b) In cases where the welder fails to meet the requirements in all parts of the required tests or
in the retest prescribed in (a) above, the welder should undertake further training and practice.
(2) Where any test specimen does not comply with dimensional specifications due to poor machin-
ing, a replacement test assembly should be welded and tested.
5. Certification
(1) Qualification certificates are normally issued to the applicants(shipbuilder or manufacturer) when the welder has passed the qualification test by the Society.
(2) The following items should be specified in the certificate:
(a) Range of qualification for materials, welding processes, types of welded joint, plate thick- nesses and welding positions;
(b) Expiry date of the validity of the qualification;
(c) Name, date of birth, identification and the photograph of the welder;
(d) Name of shipbuilder / manufacturer.
6. General requirements for qualification validity
(1) Each shipyard and manufacturer should be responsible for the employment, training, testing, con- trol of the validity of the certificate and the range of the approval of the welders.
(2) Where welder has not engaged in a particular process and equipment for a period exceeding six
months, his qualification is automatically withdrawn. All the following conditions are fulfilled
for maintaining welder's qualification.
(a) The welder should be engaged with reasonable continuity on welding work within the cur-
rent range of approval. The welder's work should in general be in accordance with the tech- nical conditions under which the approval test is carried out.
(b)
(c)
The qualification validity of welder is to be confirmed at six-month intervals by the ship- yards/manufacturers responsible for weld quality.
The status of approvals of each individual qualification is to be demonstrated to the
Classification Society when requested.
![]()
![]()
(3) The welder failed to meet the required qualify of the Society in welding work may be sus- pended his qualification. See Guidance
![]()
144 Rules for the Classification of Steel Ships 2015
![]()